tslib
tslib框架分析
tslib的主要代码如下

核心在于“plugins”目录里的“插件”,或称为“module”。这个目录下的每个文件都是一个module,每个module都提供2个函数:
read:前者用于读取单点触摸屏的数据
read_mt:后者用于读取多点触摸屏的数据。
要分析tslib的框架,先看看示例程序怎么使用,我们参考ts_test.c和ts_test_mt.c,前者用于一般触摸屏(比如电阻屏、单点电容屏),后者用于多点触摸屏。
一个图就可以弄清楚tslib的框架

调用ts_open后,可以打开某个设备节点,构造出一个tsdev结构体。然后调用ts_config读取配置文件的处理,假设/etc/ts.conf内容如下:
module_raw input
module pthres pmin=1
module dejitter delta=100 	// 去抖动
module linear				// 线性比例变换
每行表示一个module或moduel_raw
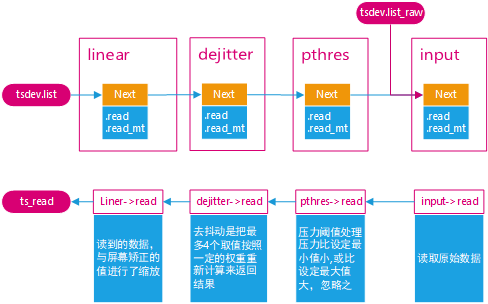
对于所有的module,都会插入tsdev.list链表头
对于所有的module_raw,都会插入tsdev.list_raw链表头,一般只有一个module_raw
tsdev.list中最后一个module会指向ts_dev.list_raw的头部
组成的结构如下图所示:

无论是调用ts_read还是ts_read_mt,都是通过tsdev.list中的模块来处理数据的。这些模块是递归调用的,比如linear模块的read和read_mt函数如下:
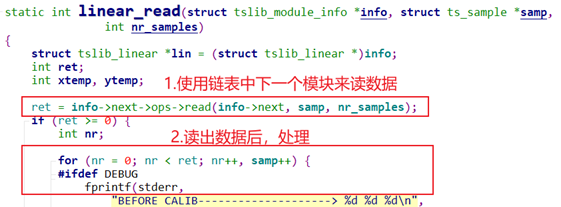

因为是递归调用,所有最先使用input模块读取设备节点得到原始数据,再依次经过pthres模块、dejitter模块、linear模块处理后,才返回最终数据,所以数据的传递过程如下:
交叉编译
安装依赖
sudo apt-get install autoconf automake autogen libtool libsysfs-dev pkg-config # 安裝依赖自动生成makefile文件
./autogen.sh
编译
方案1:手动copy
mkdir install   # 创建安装目录

./configure --host=arm-linux-gnueabihf --prefix=$(pwd)/install CC=/opt/arm-linux-gnueabihf/bin/arm-linux-gnueabihf-gcc

make
make install
编译完后安装目录为:

然后拷贝安装目录下的文件到自己的文件系统
sudo cp install/* ~/nfs_rootfs -rfd
方案2:直接设置安装目录为自己的跟文件系统目录
# /home/xym/nfs_rootfs   自己已经存在的安装目录

./configure --host=arm-linux-gnueabihf --prefix=/home/xym/nfs_rootfs CC=/opt/arm-linux-gnueabihf/bin/arm-linux-gnueabihf-gcc

make
sudo make install  # 注意:这里必须加sudo
可以看到安装目录正是自己的文件系统的目录

方案3:使用buildroot构建文件系统的时候直接勾选即可
待验证
配置tslib
上面我们把tslib安装到了自己的文件系统下
/home/xym/nfs_rootfs,还需简要修改修改
/home/xym/nfs_rootf/etc/ts.conf:保证下面的选项打开module_raw input module pthres pmin=1 module dejitter delta=100 module linear
修改
/home/xym/nfs_rootf /etc/profile:添加tslib的环境变量#触摸设备文件名 export TSLIB_TSDEVICE=/dev/input/event0 #配置文件名。 export TSLIB_CONFFILE=/etc/ts.conf #插件目录 export TSLIB_PLUGINDIR=/lib/ts #校准数据文件,由ts_calibrate校准程序生成。 export TSLIB_CALIBFILE=/etc/pointercal #控制台设备文件名 export TSLIB_CONSOLEDEVICE=none #显示设备名 export TSLIB_FBDEVICE=/dev/fb0 #由于我们安装目录就是系统的/lib,默认在动态库的搜索路径,所以这里不再设置 #export LD_LIBRARY_PATH=$LD_LIBRARY_PATH:/lib
修改好后的样式如下:

测试
参见【18.input/input_1】工程